Light Socket Camera Manual

Quick Manual For IOS and Android
HOW-TO WALK THROUGH VIDOES
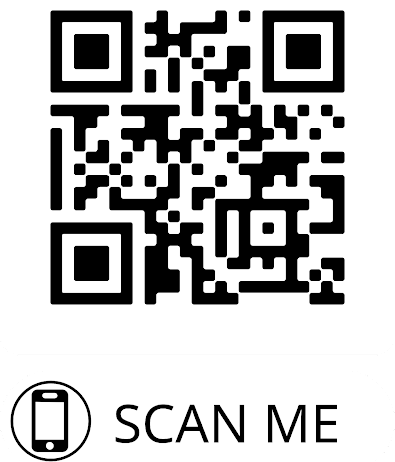
SCAN THE QR CODE FOR VIDEO TUTORIALS AND WALK THROUGHS ON HOW TO PROPERLY INSTALL YOUR LIGHT BULB SECURITY CAMERAS.
Download The Cameras App
Step 1: Open your phones camera and Scan the QR code below.

Note: If you cannot scan the QR code, Please open your app store and search for Yi iOT in the app store to download.
The app will be a blue icon with a Camera logo, you’ll need to install this app to your phone.

For IOS Users you can also click this link: CLICK HERE
For Android users you can click here: CLICK HERE
Once the app is installed on your IOS phone or Android you’ll need to sign up for an account BEFORE you can access the camera.
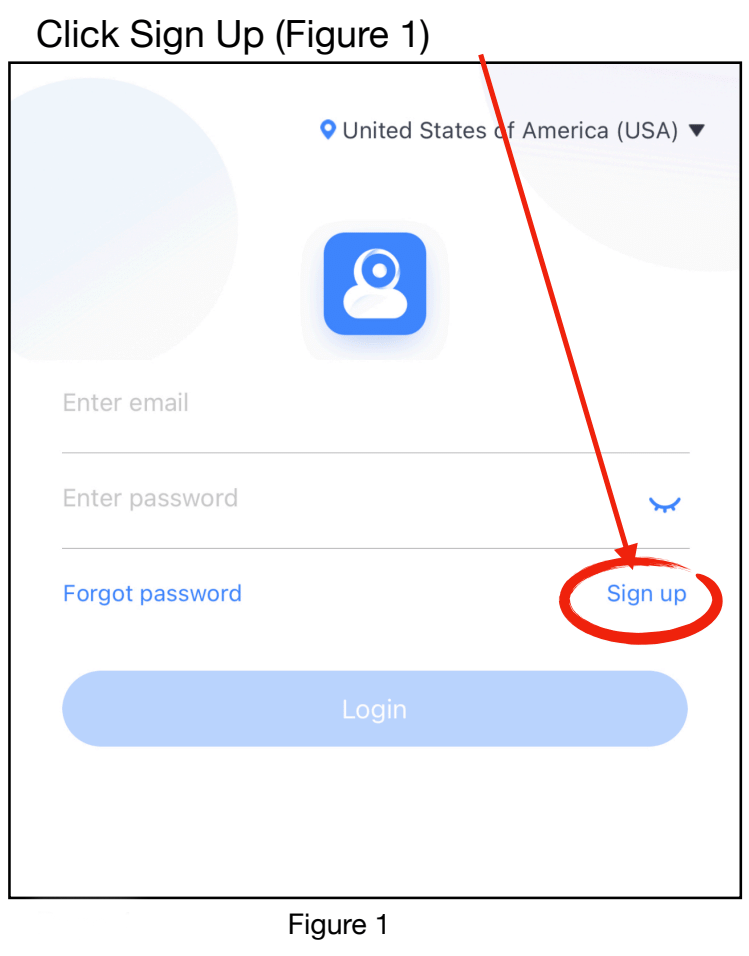
New users must create a new account via the Yi Iot App on their phone.
Next
A) Enter your email address you would like associated with the account (MAKE SURE YOU CHECK SPELLING).
B) Enter a Secure Password for the account NOTE: Password must be 8-16 characters and must include at least: one number, one uppercase letter and one lower case character. (Example: Camera2023)
C) Verify The Password You Just Entered
D) Type the code you see in the box
(See Figure 2)

Once Signed up, you’ll be shown a screen on the app that is letting you know an email activation link has been sent to the SAME EMAIL you just created an account with. (See Figure 3)

Log in to your email email and you’ll see an email from: “NoReply@uc.yitechnology.com“ with subject line:
“Action Required to Activate Your YI IoT Account”
Open this email and click the link to activate your account.

After you’ve clicked the link from your email, you’ll see a ‘Success Screen’ that pops up verifying your account has now been activated correctly.

Now that you’re back at the login screen, type in your Email and Password that you used to register your account with to OFFICIALLY login to the app.
Once logged into the app, you’ll be able to start registering your cameras!

ADDING A CAMERA
If you have not setup an account from the instructions above, you’ll need to do so prior to having the ability to link a camera.
NOTICE TO CUSTOMER: When setting up the camera you will be asked if you like to join the cloud storage for a monthly fee, please understand this is NOT REQUIRED in order to view and use your cameras
Step 1: Screw the Light Socket Security Camera into a light socket

SUBSCRIPTION NOT REQUIRED:
When setting up the camera you will be asked if you like to join the cloud storage for a monthly fee, please understand this is NOT REQUIRED in order to view and use your cameras and record, you’ll be able to use an SD Card for storage.
Make sure the power to the lock socket is ON.
The camera does not come with batteries nor take batteries, it is solely powered by the outlet, which means power to the outlet will need to stay ‘ON’ when wanting to use the camera.

Screw The Camera Into The Light Socket:
Once the Camera has been screwed into the outlet AND power has been turned on, the camera will flash its LED Lights for 3 seconds. This is letting you know the camera is powered and has begun the startup process. You should see the camera rotating and making a few beeping noises.
Once the camera has completed its cycle (approx 60 seconds) you’ll hear two beeps every 10 seconds. These two repeating beeps are letting you know the camera is ready to be added to your phone app.
I DON’T HEAR THE BEEPS
If you don’t hear any beeps and the power is on, you’ll need to reset the camera. To reset the camera, keep the camera plugged into the light socket AND powered on. Then, using a paperclip insert it into the small hole labeled ‘RESET’ found on the back of the camera near the SD Card insert. Push in the paper clip in until the camera says “Reset is successful” letting you know the camera if fully reset to factory.

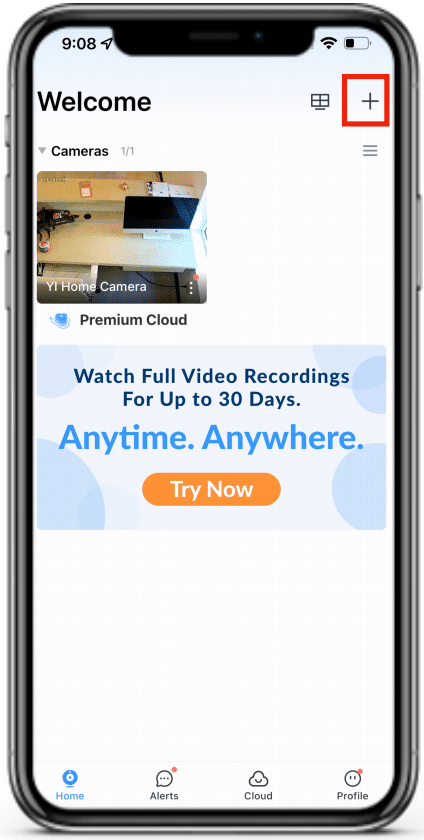
Step 2: Open your phone app and click the ‘PLUS’ sign on the top right to add a Light Socket Security Camera

Step 3: Next, select the “Wifi Connection” Option to begin connecting your camera to your wifi. Please make sure the camera is NEAR a wifi connection and that you have your Wifi NAME and Wifi PASSWORD ready.

SUBSCRIPTION NOT REQUIRED:
When setting up the camera you will be asked if you like to join the cloud storage for a monthly fee, please understand this is NOT REQUIRED in order to view and use your cameras and record, you’ll be able to use an SD Card for storage and review recordings from the SD Card for FREE.
Step 4: Wait till you hear the 2 beeps, once you hear the 2 beeps check the box “I Heard The Beep” and click “Next”
I DON’T HEAR THE BEEPS: If you don’t hear the 2 beeps this means the camera has turned off due to time limit. Please power off the camera and re-boot by simply turning off the power to the camera and back on via the Light Wall Switch.

Step 5: Connect To Your Wifi by selecting your wifi network.
Once the network is selected, enter the password for your wifi network.
Step 6: Connect the camera to the app.
Make sure your PHONE brightness is on
100%, also remove any screen covers you
have on your phone for the camera to read
the QR code properly.
Hold the phone with the QR code in front Of your camera while moving the phone Closer and further away from the camera SLOWLY. Do this until the camera has connected to the app


MY CAMERA IS NOT CONNECTING
Try rebooting your camera by cycling the power to the camera and letting the camera turn off and back on, then repeat step 6.
2) If you still are having trouble connecting your camera, you’ll need to RESET your camera. While keeping POWER ON to the camera use the reset tool that came with your camera. Near the SD Card Slot, you’ll see a RESET PIN HOLE. Hole tool inside hole until camera resets, then repeat back to STEP 2.
Once you hear “Waiting To Connect” you can hit the next button.
Step 7: Pairing process takes about 1 to 2 minutes. Please wait while your phone communicates back and forth with your phone app.


Step 8: An Authentication link has been sent to your email.
You’ll need to EXIT the app and open your email account.
You should’ve received an email from
security-noreply-us-10@yitechnology.com
Subject Line: Camera pairing Authentication
Step 9: Open the email from Yi IoT. Click “Finish Pairing Camera” button


Step 10: Your Camera Is Paired On this step, you’ll want to type in custom name or select one of the suggested camera names. Then hit Next.
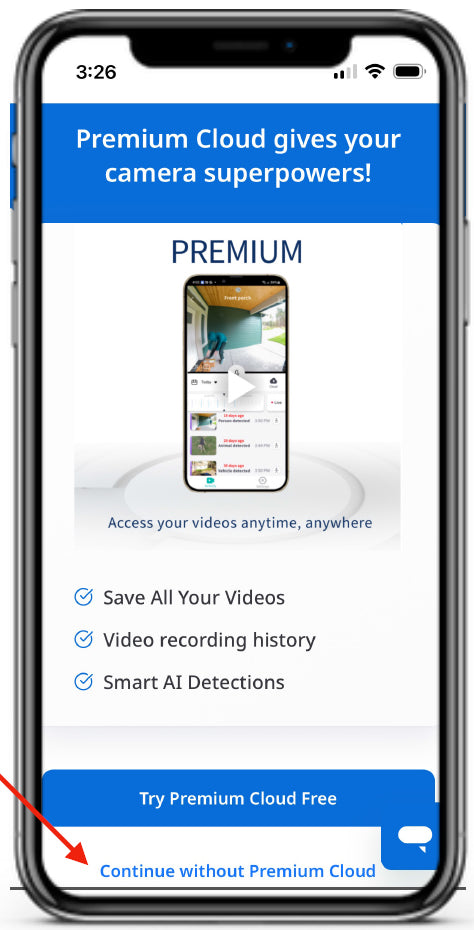
Step 11: Premium Cloud Storage.
If you DO NOT WANT cloud storage and just want to use the 64 GB SD Card to record footage you’ll want to OPTOUT of the Premium Cloud.
OPTING OUT:
11.1) Click the ‘continue without premium Cloud’ link on the bottom of the screen

11.2) You’ll be asked if you are sure you don’t want Cloud Storage. Simply click the “Continue Without Premium Cloud” to never be charged a monthly subscription for cloud storage. By inserting a 64 GB SD card you’ll have access to all the recordings through the app.
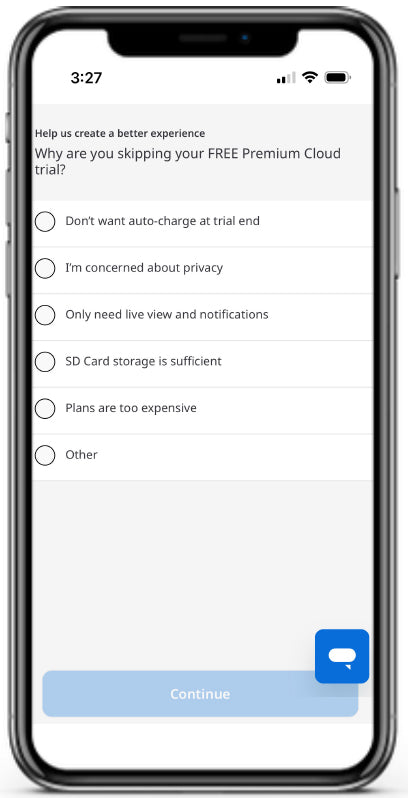
Step 12) If opting out, you’ll be Asked for a reason.
Choose a reason you’re not selecting to have cloud storage, then hit continue.
Step 13) Setup Complete
Lastly, you’ll see a setup complete Screen with the label you created for that particular camera.
Step 13) Setup Complete
Lastly, you’ll see a setup complete Screen with the label you created for that particular camera.

Click ‘Launch App’
Step 14) Viewing Your Camera

When first starting up the app after completing the camera setup, you’ll see a Pro Security Screen.
To access your connected camera, You’ll want to click on the ‘HOME’ icon located on the bottom left of your device.


You’ll see that a camera has been added, to view the LIVE STREAM of your camera, you’ll need to simply hit the PLAY button.
NOTE: After you press the play button, the thumbnail on the screen will change to your cameras background.
To Add Another Camera, simply repeat STEPS 1 through 14.
Installing The Micro SD Card Into Your Camera.
To install your MICRO SD Card, you’ll want to face the gold plated PINS pointed towards the camera lens. (Figure 1)
Once inserted, you’ll hear the SD CARD ‘click’ into place. Your SD CARD is now locked into the camera for recording video & audio. (Figure 2)

Viewing Your Camera And Settings
How To Use The Phone App:
Now that your camera is setup in your phone app, you’ll be able to set the camera up to your liking.

To access the settings for each individual camera, you’ll need to click on the camera you want to change the settings in.
Next, once you have the camera up for viewing. You’ll click on the settings button located on the top right side of the screen.

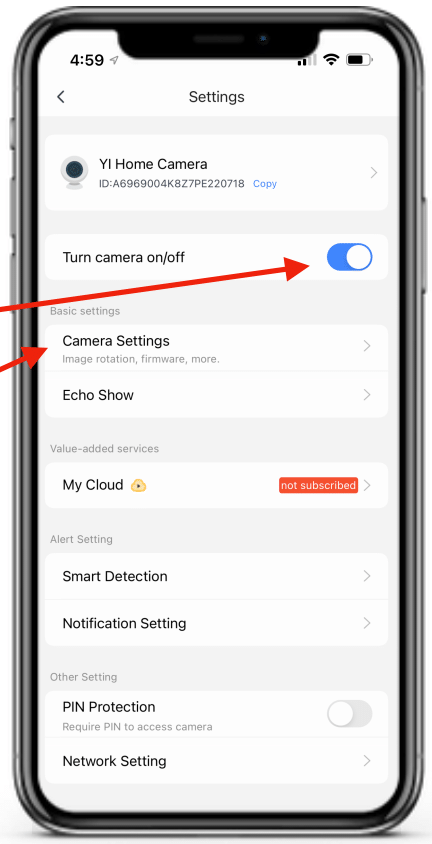
Once in the settings you have many options to choose from!
Turn Camera on/off:
When at home or during the day you can toggle your camera off.
Camera Settings:
Inside camera settings you’ll have options such as Image Rotation, Microphone On/Off, Night Mode, and more!
Clicking inside of Camera Settings, the first option will be “Image Rotation”. By toggling on Image Rotation you’ll rotate the video image by 180°. This is particularly useful when the camera is plugged in upside down and you need to rotate the video image to be right side up.
Next is the “Camera Microphone” by enabling this to be on, you’ll be able to capture sound.
“Night Mode” will give you (3) options. Click on Night Mode to choose how the camera displays video at night.

Full Color Night Vision
Full color night vision will show the video surveillance in color, however - to do this will have the 4 LEDs ON constantly giving away the location of the camera.
Infrared Night Vision
This night vision uses infrared light, undetectable by the naked eye to see at night. The video will be in black & white.

**Smart Night Vision (Most Popular)
This night vision uses infrared light to DETECT motion. Once motion is detected the camera will turn on all 4 LED lights on alerting the intruder they are being watched.
“Motion Tracking”
With motion tracking on, once the camera sees activity it will rotate and follow the motion until it goes out of sight. The camera will then return to its original set position.
“Smart Detection”
Smart Detection will give you options Such as tracking motion and how high you’d like the sensitivity level to be along with a few other options.

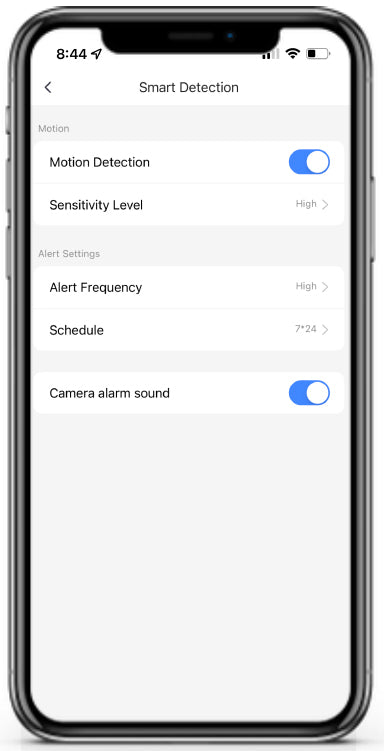
Inside of “Smart Detection” you’ll be able to toggle on “Motion Detection” which will send alerts to your phone when turned on AND when the camera tracks motion.
Depending if you have Trees that blow outside or a swing that moves in the wind and would rather not get an alert each time you can LOWER the sensitivity level to reduce how sensitive the camera is to tracking movement. The higher the sensitivity the more smaller movements become noticed.
Alert Frequency can be set from Low, Medium, and High. This is how often you want to receive notifications to your phone.
Along with the schedule that you can set to receive those alerts.
Lastly on this page is the “Camera Alarm Sound” which when toggled on, the camera will sound an ‘ALERT’ when motion is tracked by the camera alerting the intruder they are being watched.
CHECKING YOUR WIFI STRENGTH
Sometimes when a camera is placed outside, the wifi isn’t strong enough to reach that area and can cause connections issues with the camera and the app.

To make sure you have a ‘STRONG’ connection between your camera and your wifi. Simply goto ‘Network Settings’ —> ‘info’ —> And check your Signal Intensity. If your signal intensity is WEAK or LOW, you’ll need to move your camera closer to your wifi connection.

ADDING MULTIPLE CAMERAS
(WITHOUT BUYING CLOUD STORAGE)
1) Once you’ve installed your first camera.
You’ll want to go back to the home screen and click on the ‘+’ button on the top right.
You’ll then start the entire process of adding a camera again as shown on pages 9 through 18.
Rest assured - you do NOT have to subscribe to cloud storage to add multiple cameras to the app. You’ll be able to view each camera individually. (However - to view multiple cameras at the same time, you will need to upgrade to cloud storage)
Once you’ve added the second camera, you’ll be asked again if you’d like to ‘Try Premium Cloud Free’. To say no, all you must do is click the back arrow on the top left to exit.

You’ll be asked if you are sure you don’t want Cloud Storage. Simply click the “Continue Without Premium Cloud” to never be charged a monthly subscription for cloud storage. By inserting a 64 GB SD card you’ll have access to all the recordings through the app.